Dejar un mensaje
Si le interesan nuestros productos y desea obtener más información, deje un mensaje aquí y le responderemos lo antes posible.

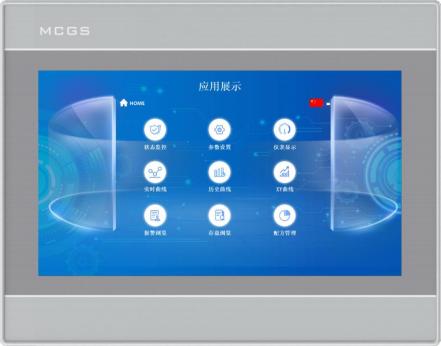
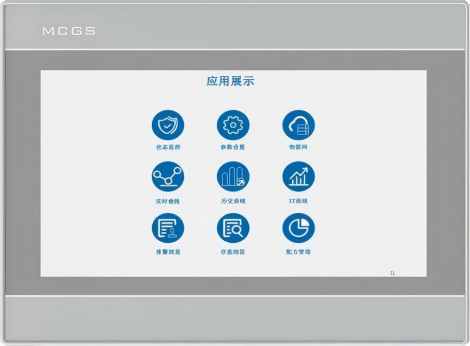
Como una de las pantallas táctiles inteligentes económicas de Kunlun Tech, la serie E TPC está dirigida a los mercados de aplicaciones de gama media y baja. Destaca por su gran adaptabilidad y se ajusta perfectamente a diversos escenarios de aplicación, satisfaciendo las múltiples necesidades de uso de los usuarios.
Número de artículo :
TPC7012EiPedido (cantidad mínima de pedido) :
50Pago :
Paypal\TT\Western UnionOrigen del producto :
Guangdong, ChinaPeso :
1KGCon una excelente relación calidad-precio, gran practicidad y un precio asequible, la serie E cuenta con una línea de productos completa y diversificada. Está configurada con 64 MB o 128 MB de memoria RAM, junto con 8 MB de almacenamiento interno, y es compatible con varias resoluciones de pantalla, así como con diversos modos de visualización..
Especificaciones del producto
| Clasificación | Artículo | TPC7012Ei |
| Características del producto | Pantalla LCD | Pantalla TFT de 7" |
| Tipo de retroiluminación | CONDUJO | |
| Colores de la pantalla | 65536 | |
| Resolución | 800×480 | |
| Brillo de la pantalla | 250 cd/㎡ | |
| Pantalla táctil | Tipo resistivo de 4 hilos | |
| Voltaje de entrada | 24±20% V CC | |
| Potencia nominal | 7W | |
| Procesador | Procesador multinúcleo Cortex-A7 de 800 MHz | |
| RAM | 64 MB | |
| Memoria flash | 128 MB | |
| Almacenamiento de datos | Máximo 8 MB | |
| Reloj de hardware | Incorporado | |
| Software de configuración | McgsPro 3.3.6.6354 SP1.3 y versiones posteriores | |
| Interfaces externas | Interfaces serie | Modo 1: COM1(232) COM2(485) COM3(485) COM4(232); Modo 2: COM1(232) COM9(422) |
| Interfaces USB | 1×Anfitrión, 1×Esclavo | |
| Puerto Ethernet | Puerto Ethernet de 1×10/100M con negociación automática | |
| Condiciones ambientales | Temperatura de funcionamiento | 0℃~45℃ |
| Humedad de funcionamiento | 5%~90% (sin condensación) | |
| Temperatura de almacenamiento | -10℃~60℃ | |
| Humedad de almacenamiento | 5%~90% (sin condensación) | |
| Dimensiones y material del producto | Material de vivienda | Plástico de ingeniería |
| Color de la carcasa | Blanco plateado | |
| Dimensiones generales | 203 mm × 149 mm | |
| Dimensiones del recorte del panel | 192 mm × 138 mm | |
| Certificaciones | Certificaciones de productos | Cumple con las normas de certificación CE/FCC. |
| Clasificación de protección IP (Ingress Protection) | IP65 (Panel frontal) | |
| Compatibilidad electromagnética (CEM) | Clase industrial 2 |
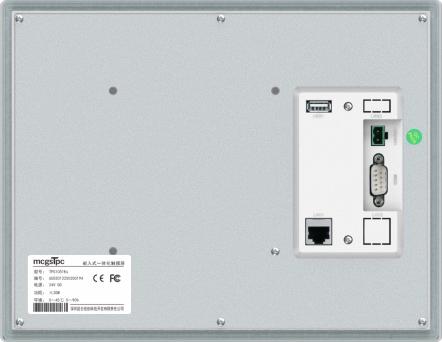
Descripción de la interfaz
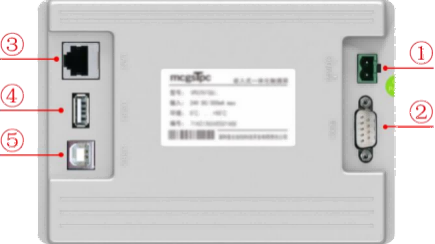
① | Fuente de electricidad |
|
| - | 1 | 0V |
+ | 2 | 24 V CC | ||||
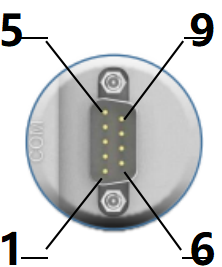
② |
Puerto serie |
|
COM1 | 2 | RS232 RXD | |
3 | Transmisión RS232 | |||||
5 | GND | |||||
COM2 | 7 | RS485+ | ||||
8 | RS485- | |||||
COM3 | 4 | RS485+ | ||||
9 | RS485- | |||||
COM9 | 7 | RXD+ | ||||
8 | RXD- | |||||
4 | TXD+ | |||||
9 | TXD- | |||||
Nota: COM9 no se puede utilizar simultáneamente con COM2 o COM3. | ||||||
③ | Puerto Ethernet | Puerto Ethernet de 10M/100M con negociación automática: admite la carga/descarga de proyectos, actualizaciones del entorno operativo (el entorno operativo de la pantalla debe ser Pro3.3.2 o superior) y la comunicación con otros dispositivos. | ||||
④ | USB1 (Host) | USB 2.0, compatible con funciones como la actualización del entorno de ejecución, los proyectos y el sistema de la pantalla táctil mediante una unidad flash USB, así como la importación y exportación de datos. | ||||
⑤ | USB2 (Esclavo) | Conector USB tipo B macho, que permite la carga y descarga de proyectos. | ||||
Instalación del producto
Dimensiones del producto
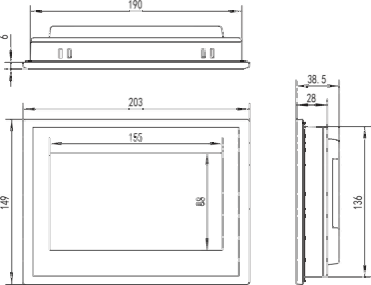
Dimensiones externas
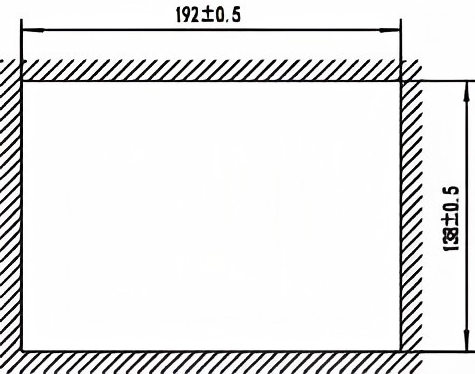
Tamaño de apertura
Método de instalación
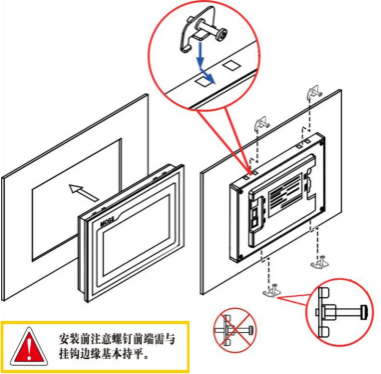
Nota antes de la instalación: El extremo frontal de los tornillos debe quedar prácticamente al ras con el borde del soporte.
Instalación de ganchos
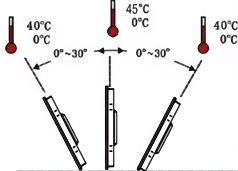
Ángulo de instalación
Mantenimiento del producto
Ubicación de la batería: En la placa de circuito impreso dentro del producto TPC.
Especificaciones de la batería: Batería de litio CR2032 de 3 V
Extracción de la batería: Retire el adhesivo de fijación que se encuentra sobre la batería, tire suavemente del clip del terminal positivo y la batería saldrá automáticamente.
Instalación de la batería: Primero, coloque la batería en el clip del terminal positivo y luego presione suavemente el otro extremo hacia abajo hasta que encaje debajo del clip de plástico. Verifique que la batería esté correctamente colocada en ambos clips de plástico y en el clip metálico del terminal positivo.
1.5.1 Batería de repuesto
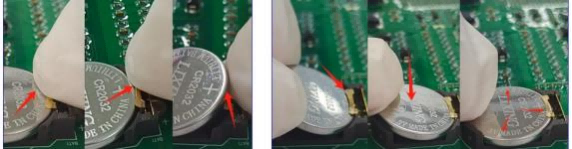
Retire la batería Instale la batería
1.5.2 Calibración táctil
Ingrese TPC En la interfaz de configuración del sistema, mantenga presionado un área en blanco. 3 El proceso de calibración táctil comenzará en segundos.
Calibración TPC: Use un lápiz óptico o un dedo para presionar suavemente y mantener presionado el punto central del cursor en forma de cruz. Cuando el cursor se mueva al siguiente punto, levántelo.
Repita esta acción hasta que aparezca el mensaje "Se han medido los nuevos ajustes de calibración".
Haga clic en el botón "Confirmar calibración" para guardar y salir del programa de calibración.
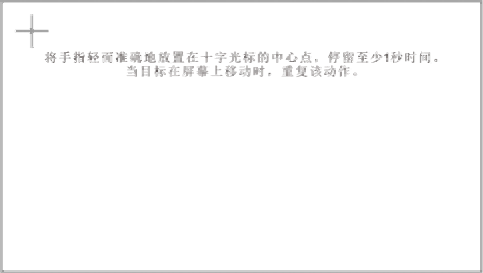
Coloca el dedo suave y precisamente en el centro del cursor en forma de cruz y manténlo presionado durante al menos un segundo mientras el objetivo se mueve por la pantalla. Repite esta acción.
1.5.3 Película a prueba de tres capas
La aplicación de una película protectora triple al TPC previene eficazmente la contaminación y la corrosión causadas por polvo, manchas de aceite y otras sustancias generadas durante la producción. Por lo tanto, si es necesario, el TPC puede protegerse con una película protectora triple. Esta sección toma como ejemplo el modelo 1271Gn; los pasos de aplicación de la película para otros modelos de TPC son similares.
Herramientas de preparación: Película protectora triple compatible con TPC (disponible a través del canal de compra de TPC), paño sin polvo, limpiador antiestático ecológico y rodillo.
Pasos de operación:
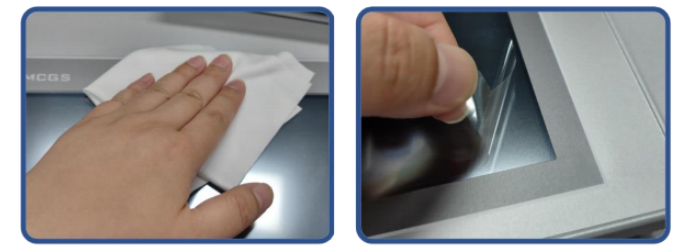
1) Limpie la pantalla. Use un paño para quitar el polvo del panel frontal y evitar burbujas al aplicar el protector de pantalla. Si la superficie TPC está muy sucia, use un limpiador para eliminar los contaminantes de las ranuras alrededor de los bordes.
2) Retire la película protectora de PET instalada de fábrica y limpie cualquier residuo para evitar la formación de burbujas durante la aplicación.
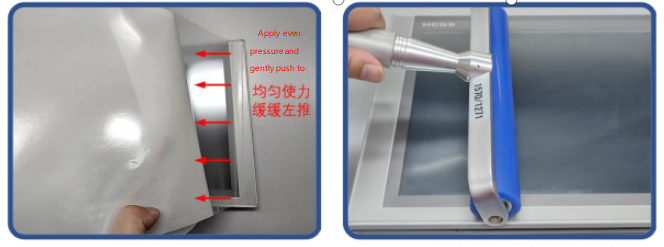
3) Despegue una esquina de la película protectora del lado derecho. Alinee el lado derecho de la película con el lado derecho del TPC. Con la mano izquierda, retire lentamente la película protectora y, con la mano derecha, aplique una presión uniforme para empujar suavemente la película sobre la pantalla de derecha a izquierda.
4) Después de aplicar la película, utilice un rodillo para presionar firmemente el reverso adhesivo y evitar la formación de burbujas de aire.
Precauciones:
1) Antes de aplicar la película de triple protección, se debe retirar la película protectora de PET instalada de fábrica.
2) La película de triple protección es un consumible. Si se detecta que los bordes se levantan o aparecen burbujas, debe reemplazarse por una nueva.
3) Al reemplazar la película de triple protección, despegue desde la esquina inferior derecha del panel frontal.
Tenga cuidado de no rayar la película protectora.
2 Descarga del proyecto
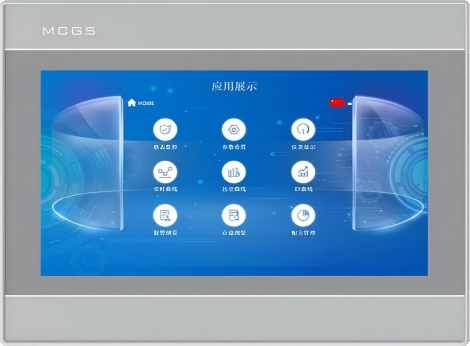
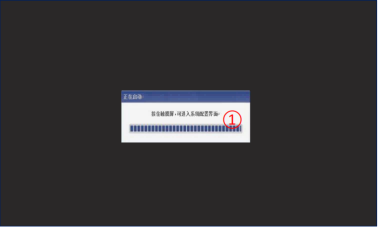
Paso 1: Encienda el TPC con una fuente de alimentación de 24 V CC. Tras el arranque, aparecerá una barra de progreso con el mensaje "Mantenga pulsada la pantalla táctil para acceder a la interfaz de configuración del sistema". En este punto, pulse el TPC ① para acceder a la interfaz de configuración de arranque; si no realiza ninguna acción, el dispositivo accederá automáticamente a la interfaz de ejecución del proyecto.
Paso 2: Haga clic en el botón Configuración de parámetros del sistema ②. Ingrese a la interfaz de configuración del sistema TPC.

Paso 3: Seleccione la pestaña Configuración de red ③ y configure... Dirección IP de TPC 4, la dirección IP predeterminada de TPC es 200.200.200.190.

Paso 4: Conecte el ordenador al TPC mediante un cable de red y configure la dirección IP del ordenador para que esté en la misma subred que la dirección IP del puerto LAN del TPC.

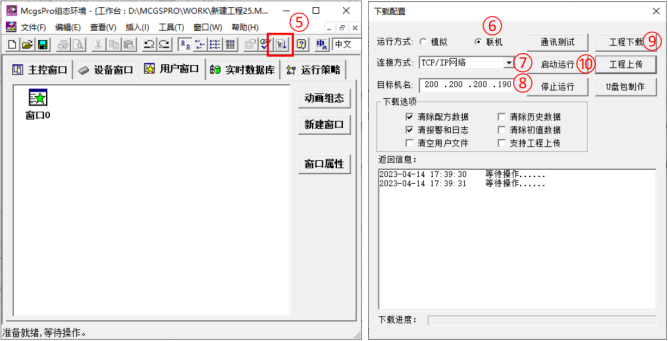
Paso 5: Abra el proyecto TPC con McgsPro y haga clic en Descargar proyecto ⑤ para abrir la página de configuración de descarga. Seleccione el modo de ejecución como "En línea" ⑥, seleccione el método de conexión como "Red TCP/IP" ⑦ e ingrese el nombre del dispositivo de destino como la dirección IP del TPC ⑧. Haga clic en Descargar proyecto ⑨. Después de que aparezca el mensaje que indica que la descarga del proyecto se realizó correctamente, haga clic en Iniciar ejecución ⑩ o en el botón "Entrar en el entorno de ejecución" en la interfaz del TPC para ejecutar el proyecto en pantalla.

Dejar un mensaje
Escanea y envíalo a WeChat. :

Escanea y envíalo a WhatsApp. :